Step 2: Verify the Service Contracts Coverage
Value Proposition: Our meticulous testing process safeguards your business operations by ensuring comprehensive coverage of all devices under active service contracts. By meticulously cross-referencing the testbed against our comprehensive database, we validate that every critical network component is backed by our unwavering support and expertise. This proactive approach empowers you with the confidence and peace of mind that should any unforeseen challenges arise in your production environment, our dedicated Technical Assistance Center (TAC) will be readily available to swiftly resolve issues, minimizing downtime and mitigating potential revenue losses.
The high-level logic of the tests will be the following:
Connect to each device in the testbed.
Parse the output of the show inventory command to find the device’s serial number (SN).
Verify whether the SN is in the list, covered by the service contracts.
Let’s use the pyATS shell to test our idea.
pyats shell --testbed-file pyats_testbed.yaml
Copy the following code into the pyATS shell:
csr = testbed.devices['csr1000v-1']
asa = testbed.devices['asav-1']
nx = testbed.devices['nx-osv-1']
csr.connect(log_stdout=False)
asa.connect(log_stdout=False)
nx.connect(log_stdout=False)
pyATS uses the parse method to collect the output of different show commands and parses it into a structured format (Python dictionary). Let’s collect the output of the show inventory commands and parse it using the parse method.
csr_output = csr.parse('show inventory')
asa_output = asa.parse('show inventory')
nx_output = nx.parse('show inventory')
Now we can observe the structure of parsed outputs. We are starting with the parsed output for csr1000v-1. Review it and pay special attention to the highlighted sections.
Note
The Python library pprint will be used in this task. This is used to break the output (Python dictionary) into multiple lines, which is easier to check, instead of having it all on one line.
import pprint
pprint.pprint(csr_output)
Observe the output:
In [3]: import pprint
    ...: pprint.pprint(csr_output)
{'main': {'chassis': {'CSR1000V': {'descr': 'Cisco CSR1000V Chassis',
                                'name': 'Chassis',
                                'pid': 'CSR1000V',
                                'sn': '93DU60U0JDU',
                                'vid': 'V00'}}},
'slot': {'F0': {'other': {'CSR1000V': {'descr': 'Cisco CSR1000V Embedded '
                                                'Services Processor',
                                        'name': 'module F0',
                                        'pid': 'CSR1000V',
                                        'sn': '',
                                        'vid': ''}}},
        'R0': {'rp': {'CSR1000V': {'descr': 'Cisco CSR1000V Route Processor',
                                    'name': 'module R0',
                                    'pid': 'CSR1000V',
                                    'sn': 'JAB1303001C',
                                    'vid': 'V00'}}}}}
Get the serial number of csr1000v-1
csr_output['main']['chassis']['CSR1000V']['sn']
The result of the code should contain a serial number collected in the previous step.
In [4]: csr_output['main']['chassis']['CSR1000V']['sn']
Out [4]: '9KZZ4X737UP'
Obtain the parsed output for asav-1
pprint.pprint(asa_output)
Observe the output:
In [5]: pprint.pprint(asa_output)
{'Chassis': {'description': 'ASAv Adaptive Security Virtual Appliance',
            'pid': 'ASAv',
            'sn': '9AFQR3ND0EG',
            'vid': 'V01'}}
Get the serial number of asav-1
asa_output['Chassis']['sn']
The result of the code should contain a serial number collected in the previous step.
In [6]: asa_output['Chassis']['sn']
Out[6]: '9AFQR3ND0EG'
Obtain the parsed output for nx-osv-1
pprint.pprint(nx_output)
Observe the output:
Out [1]: {'name': {'Chassis': {'description': 'Nexus9000 9000v Chassis',
              'pid': 'N9K-9000v',
              'serial_number': '9712TV4C2JF',
              'slot': 'None',
              'vid': 'V02'},
Get the serial number of nx-osv-1
nx_output['name']['Chassis']['serial_number']
The result of the code should contain a serial number collected in the previous step.
In [7]: nx_output['name']['Chassis']['serial_number']
Out[7]: '9EIFZPG7ZAM'
Now we have all the needed information to write the next test script.
Exit the pyATS shell using the exit command.
Open the file task3step2.py in Nano editor:
nano task3step2.py
Review the content of the Inventory test case. Note that we use the data structure learned from the pyATS shell in the previous step to extract a serial number from the output of the show inventory command:
@aetest.test
def inventory(self,device):
    if device.os == 'iosxe':
        csr_output = device.parse('show inventory')
        chassis_sn = csr_output['main']['chassis']['CSR1000V']['sn']
Note
The path to fetch the serial number from the structures has been explored in the previous step with the pyATS shell. Variables out2 and out3 are used:
elif device.os == 'nxos':
    nx_output = device.parse('show inventory')
    chassis_sn = nx_output['name']['Chassis']['serial_number']
The serial number shown below is provided as an example. It would be different on the equipment in a lab.
elif device.os == 'asa':
    asa_output = device.parse('show inventory')
    chassis_sn = asa_output['Chassis']['sn']
Exit Nano without saving by pressing Ctrl + X
Execute the test script and check the Detailed Results section.
python task3step2.py --testbed-file pyats_testbed.yaml
What are the results of these testcases? All FAILED? Do you have a clue as to why? Continue reading to understand why.
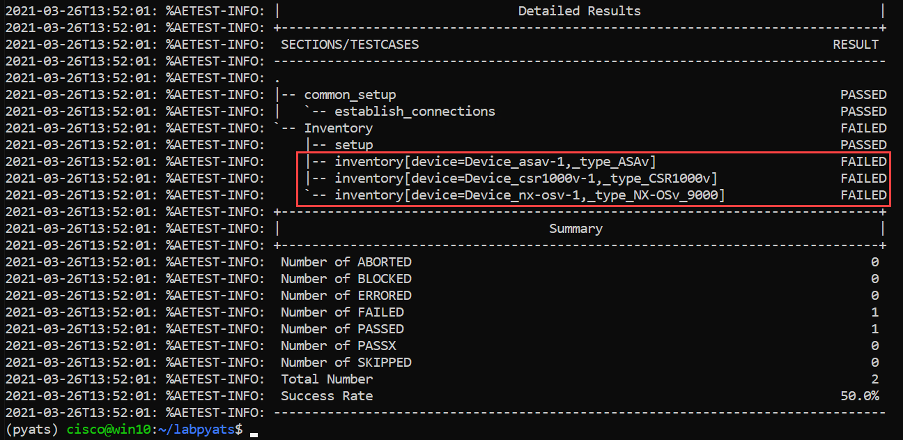
All the tests have failed because we have serial numbers from a different network in our contract SNs list at the beginning of task3step2.py file.
contract_sn = ['9AQHSSAS8AU', '9Q3YV06WJ71', '9IFUH4GPSGL']
Open the file task3step2.py in Nano editor.
nano task3step2.py
Replace the serial numbers in the list contract_sn with SNs from our testbed’s equipment.
When you finish, save changes to file task3step2.py by pressing:
Ctrl + O
File Name to Write: task3step2.py
Hit [Enter]
Note
The correct SNs from testbed can be obtained also from the previous script’s output:
2020-01-23T13:20:24: %AETEST-ERROR:Failed reason: 9AQHSSAS8AU is not covered by contract

# ...

2020-01-23T13:20:25: %AETEST-ERROR:Failed reason: 9Q3YV06WJ71 is not covered by contract

# ...

2020-01-23T13:20:26: %AETEST-ERROR:Failed reason: 9IFUH4GPSGL is not covered by contract
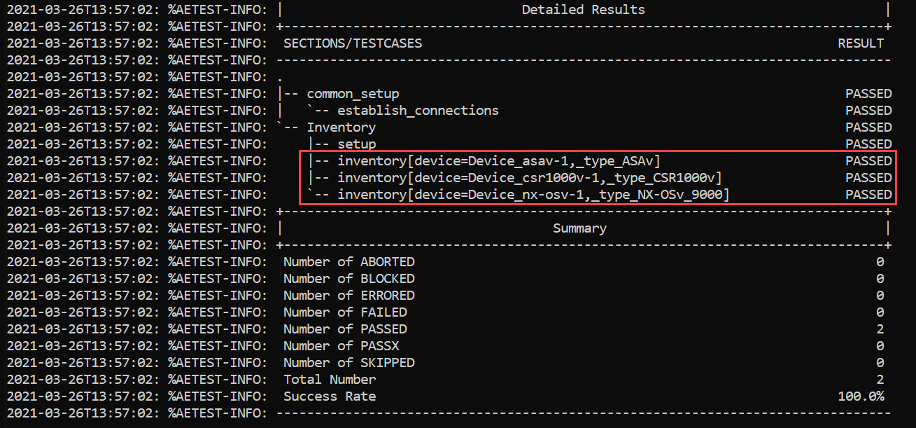
Еxecute the modified test script once again:
python task3step2.py --testbed-file pyats_testbed.yaml
Now all the testcases should succeed:
Section author: Luis Rueda <lurueda@cisco.com>, Jairo Leon <jaileon@cisco.com>